Uploading custom contract templates in Cloud Contracts 365 is a straightforward process. This feature allows users to import their templates, customise them as needed, and utilise them in contract creation.
Creating Custom Templates
In addition to creating contracts from Cloud Contracts 365 templates, you can now use Contract Builder to draft documents based on your own custom templates.
This enables you to leverage the speed and efficiency of the Cloud Contracts 365 platform with the added flexibility of being able to choose which templates you wish to create from.
Once you have uploaded your template to the Contract Library you will have the ability to customise the following contract details for each document:- Party A or B names
- Party A or B addresses
- Party A or B email addresses
- Party A or B jurisdiction
- Party A or B registered company number
- Contract effective date
Please note that these are the only details enabled for customisation through the Contract Builder questionnaire tool. All other contract clauses and details will remain the same as the original template you uploaded to the platform.
Getting started
To upload your template follow these simple steps:1. Upload your Document
From your device, select the document template you wish to upload as a template, and ensure the file format is .docx (Microsoft Word).
2. Mandatory Placeholders
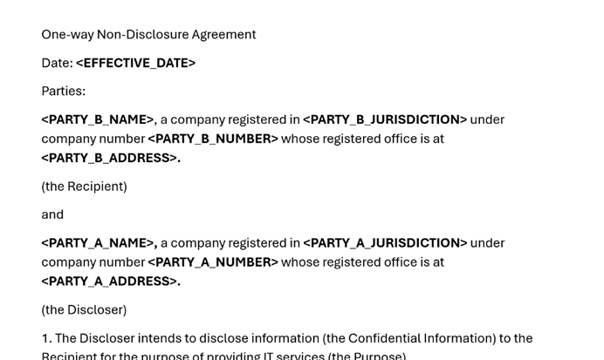
Place the following mandatory placeholder tokens in the Word document where you would like the relevant contract details to be added in the final contract:
| Placeholder | Description |
| <PARTY_A_NAME> | Party A Name |
| <PARTY_A_ADDRESS> | Party A Address |
| <PARTY_B_NAME> | Party B Name |
| <PARTY_B_ADDRESS> | Party B Address |
Example:

3. Optional Placeholders
Now add in any of the following optional placeholders you wish to include in the template:
| Placeholder | Description |
| <EFFECTIVE_DATE> | The date from which the agreement takes effect |
| <LETTER_DATE> | The date of the letter |
| <PARTY_A_NUMBER> | Party A registered company number |
| <PARTY_B_NUMBER> | Party B registered company number |
| <PARTY_A_JURISDICTION> | The country Party A is registered in |
| <PARTY_B_JURISDICTION> | The country Party B is registered in |
| <PARTY_A_EMAIL> | Party A email address |
| <PARTY_B_EMAIL> | Party B email address |
| <PARTY_B_ADDRESSEE_NAME> | The name which is used to address Party B |
4. Create
Next, in Contract Builder click ‘Create’, this will navigate you through to the Contract Library.

5. Custom Template
Once in Contract Library, select ‘Add Custom Template’.

6. Template Name
Give your new template a name e.g. ‘Custom NDA Template – Mar2024’.
7. Contract Type
Assign a contract type to the template by selecting from the choices in the drop-down list.
8. Select Template
Click ‘Upload Template (.docx).
9. Document Scanning
The document is then scanned to identify placeholders which are then used to create the template questionnaire. You will then see a summary of the placeholders found. Any mandatory placeholders that are missing will need to be added to the document before being able to proceed to the next step.

10. Placeholders Identification
If all required placeholders have been successfully identified, select ‘Create New Contract Template’.

11. Contract Template Created and Available
Your new custom contract template is now available to select under the relevant contract type accordion in the Contract Library.

12. Select and Generate
Simply click on the new template and you will be taken through to the contract questionnaire, ready to generate a new contract.

